Clone hard disk, create image of Windows computers. Backup with Rescuezilla.
Using the free software Rescuezilla, we can create an image of our hard drive or computer. Be it for a backup or for switching to a larger hard disk or SSD.
Video tutorial
What we need
For Rescuezilla we need a USB stick for the system and a USB hard drive for the backup.

- Super Speed USB 3.2 Gen 1x1
- Max. Datentransferrate: Bis zu 70,00 MB/s
- Material: Kunststoff; Gewicht: 8 g; Abmessungen: 19 x 65 x 9 mm

- 5 USB-Sticks à 8 GB Speicherplatz – perfekt für den Transport und die Sicherung wichtiger...
- Schnelle Datenübertragung dank High Speed USB 2.0 mit bis zu 28 MB/s Lesegeschwindigkeit und...
- Sofort einsatzbereit auf Windows- und Mac-Systemen ohne Installation zusätzlicher Treiber...

- Amazon Exclusive
- Erweiterung der Kapazität Ihres Computers mit einer leichten, kompakten Lösung Kampatibel mit PC...
- Sofortige Plug-and-Play-PC-Kompatibilität; Einfache Drag-and-Drop-Funktionalität

- Hohe Kapazität: Der Toshiba Canvio Partner bietet 4TB Speicherplatz, der es Ihnen ermöglicht, eine...
- Schnelle Übertragungsgeschwindigkeit: Mit seiner USB 3.0-Schnittstelle bietet diese externe...
- Einfache Handhabung: Schließen Sie einfach diese externe Festplatte an den USB-Anschluss Ihres...
Download and create the USB stick
First we download the software from the download page.
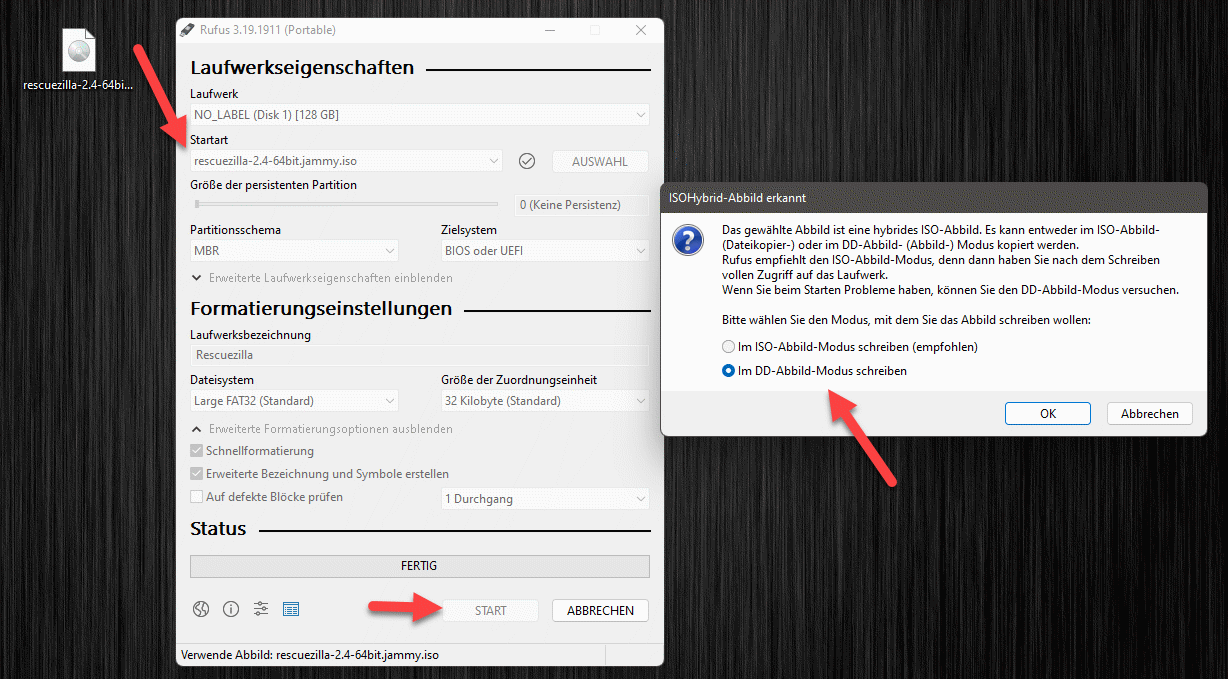
Using the software “Rufus” we then create the USB stick. Select the correct drive and the ISO file. Then click on Start. Create the image in DD mode. Small hint, all data on the USB stick will be deleted.
Booting and cloning the hard disks
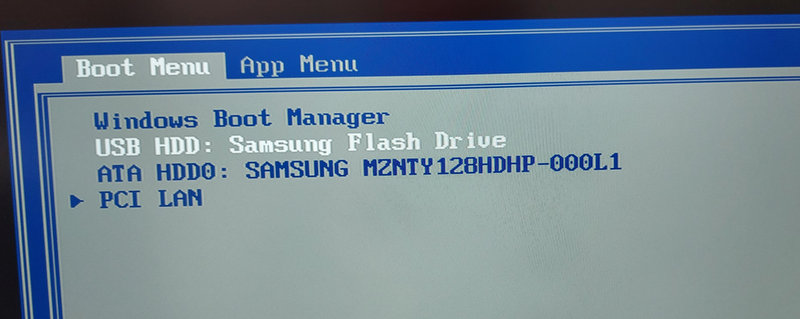
Once the USB stick is created, we can boot from it. To do this, call up the boot menu of your computer. Depending on the model, a certain key must be pressed when booting. Then we select our USB_Stick and start Rescuezilla with it.
We can now set the language, then the system starts and the main menu appears. Here we select “Save”.

In the first step we select the source drive. In our case, we recognise it quite easily because the Windows Boot Manager is recognised.

Now we select the partitions to be backed up. Normally we leave all partitions selected. This will back up the entire hard disk.

The next step is to select the target drive. Here we select our USB drive.

Optionally, we can also specify the storage location and name.

This is followed by a query regarding compression. We can simply leave this as it is. A summary is displayed.

And with this we can already start the backup. The hard disk or partitions are now backed up and stored on the backup drive.

Done! The backup is now created.
System restore
For the restore, we also start Rescuezilla again. Now we select the backup location, i.e. our USB disk.

Here we now select our backup.

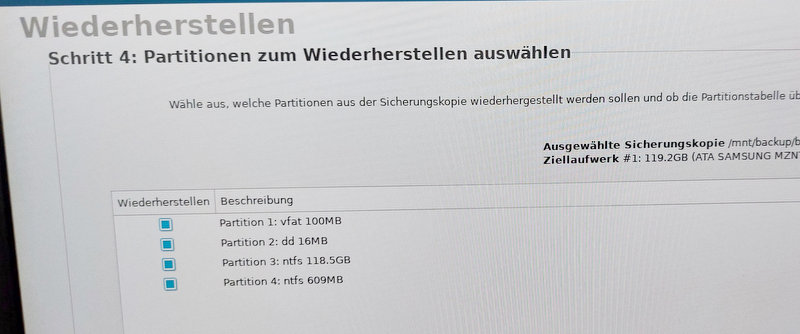
In step 3, we need to define the destination drive. All data on this drive will be replaced by the backup.

We can now specify which partitions should be restored. In the default case, all of them.
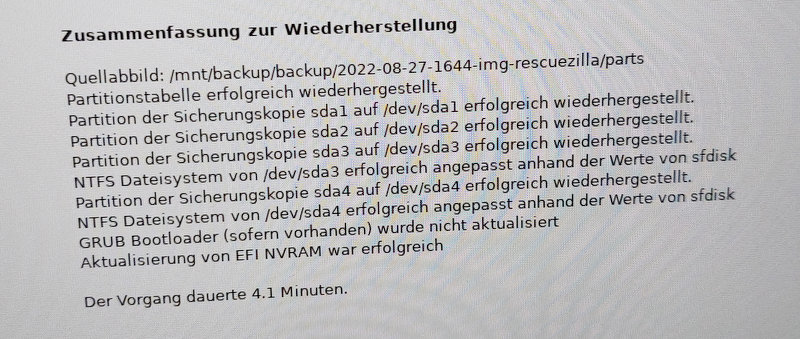
The following is a summary and then the recovery.

The backup is now applied and the system is set to the state of the backup.
Once the action is complete, we can restart the computer.