Install a new power supply unit in the computer.
When I bought a new graphics card, my computer’s power supply was slightly undersized. In principle, everything worked fine, but the manufacturer specifies 750 watts as the minimum. I had a 650 watt power supply in my computer. So I ordered a similar power supply from the same company, but with 850 watts. It turned out to be a Be Quiet Pure Power 12M. The price was around 140 euros.
Scope of delivery
The power supply comes with a whole set of cables. I don’t need these at this point, as my computer is already fully wired. The cables will therefore end up on eBay together with the old power supply unit.

Removing the old power supply
First, the old power supply unit must be removed. This is relatively easy. First remove the side plate on the housing, then loosen the 4 screws.

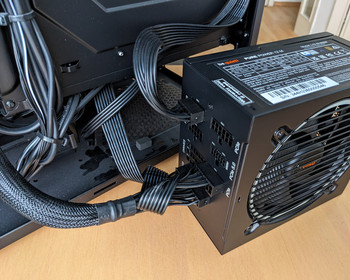
The power supply unit can now be easily pulled out. It’s a bit fiddly as the cables take up quite a lot of space.

You can’t really do much wrong with the cabling. But to be on the safe side, here’s a photo of what’s connected where.

Install new power supply unit
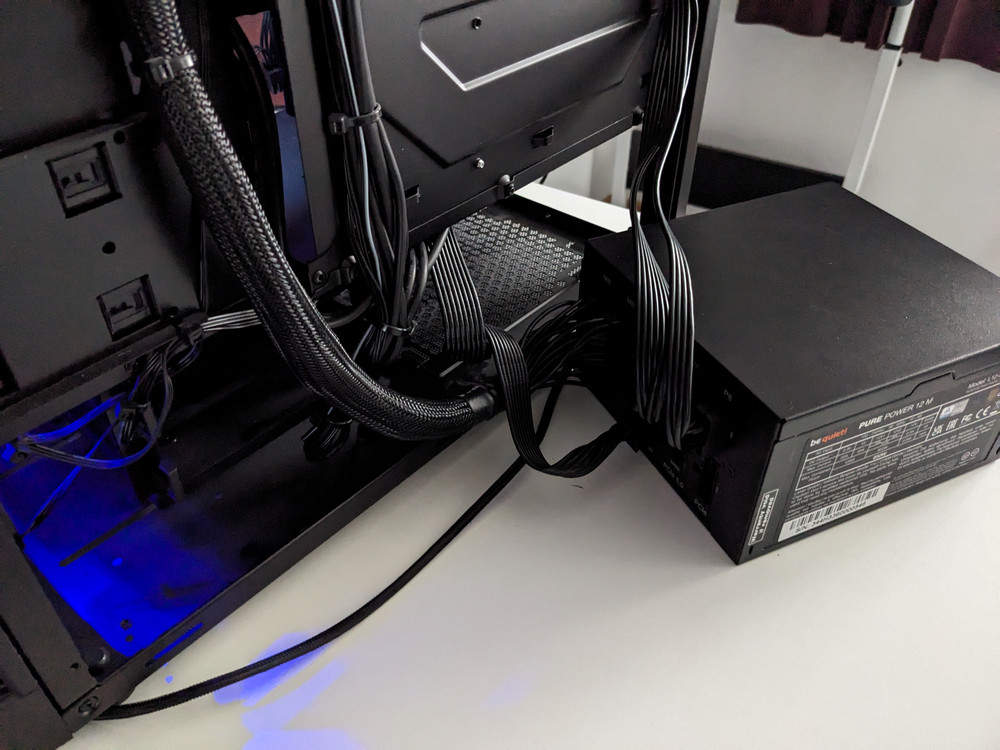
The new power supply has the same connections, plus a new 600 watt connection, but positioned slightly differently.

We start to re-plug the cables.

The new power supply unit is then pushed back in. This was a little fiddly at this point, as the new connector position meant there was a little less play in the main cable for the mainboard.

The first shock, the computer no longer starts. I pulled out the power supply again, then the all-clear, a cable had come loose. Switch on again, wait, at first everything stayed black, then after a while the redemptive message from the UEFI, picture is displayed and the computer is running.

Otherwise, a test run with the power supply unit removed is also recommended before the computer is completely screwed back together.
Everything is running again
In the end, everything worked again without any problems. Ultimately, it’s a simple matter, as the cables laid in the computer can all be reused.

- Das Pure Power 13 M 750W ist 80 PLUS Gold zertifiziert und erzielt eine herausragende Effizienz von...
- Pure Power 13 M 750W ist ein ATX 3.1 -Netzteil und kommt mit einem 12V-2x6-Anschluss für Next-Gen...
- Pure Power 13 M bietet 750W an kontinuierlicher Leistung auf einer massiven 12V-Leitung. Selbst wenn...

- Das Pure Power 13 M 1000W ist 80 PLUS Gold zertifiziert und erzielt eine herausragende Effizienz von...
- Pure Power 13 M 1000W ist ein ATX 3.1 -Netzteil und kommt mit einem 12V-2x6-Anschluss für Next-Gen...
- Pure Power 13 M bietet 1000W an kontinuierlicher Leistung auf einer massiven 12V-Leitung. Selbst...

- Das Pure Power 12 750W ist 80 PLUS Gold zertifiziert und erzielt eine herausragende Effizienz von...
- Pure Power 12 750W ist ein ATX 3.1 -Netzteil und kommt mit einem 12V-2x6-Anschluss für Next-Gen...
- Pure Power 12 bietet 750W an kontinuierlicher Leistung auf einer massiven 12V-Schiene. Selbst wenn...
- Das Pure Power 12 850W ist 80 PLUS Gold zertifiziert und erzielt eine herausragende Effizienz von...
- Pure Power 12 850W ist ein ATX 3.1 -Netzteil und kommt mit einem 12V-2x6-Anschluss für Next-Gen...
- Pure Power 12 bietet 850W an kontinuierlicher Leistung auf einer massiven 12V-Schiene. Selbst wenn...

- Das Pure Power 13 M 850W ist 80 PLUS Gold zertifiziert und erzielt eine herausragende Effizienz von...
- Pure Power 13 M 850W ist ein ATX 3.1 -Netzteil und kommt mit einem 12V-2x6-Anschluss für Next-Gen...
- Pure Power 13 M bietet 850W an kontinuierlicher Leistung auf einer massiven 12V-Leitung. Selbst wenn...