Clone hard disk or SSD with RescueZilla.
After MiniTool ShadowMaker no longer allows hard drive cloning in the free version, I looked for an alternative. RescueZilla is a free open-source software that allows us to clone SSDs or hard drives.
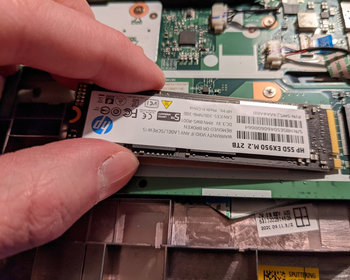
In our example, we want to move Windows 11 to a larger SSD.
Video
Download
Let’s start with the download of RescueZilla. On the download page you can download the latest version as an ISO file.

Create bootable USB stick
Now we need a USB stick. Note: the action will erase the stick. For the creation we use the free software Rufus.
We start Rufus and select drive and ISO file. As partition scheme GPT and UEFI. On older systems MBR and BIOS.
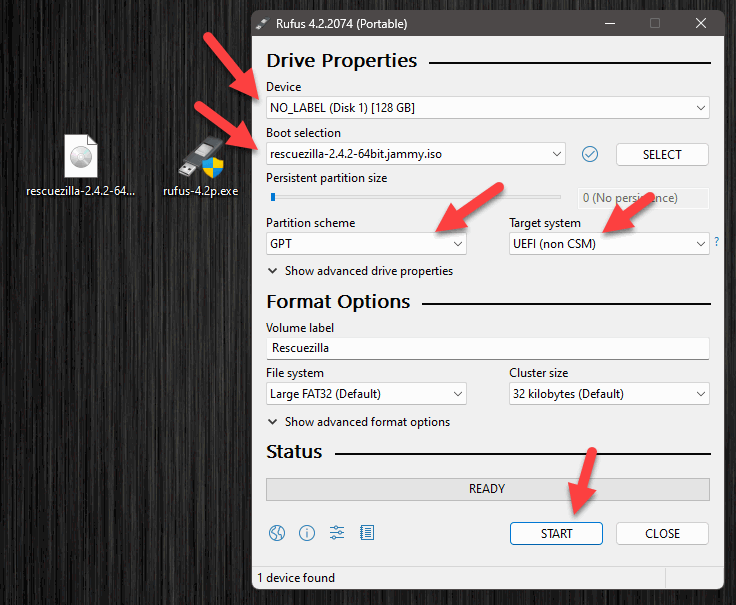
We now click Start, the subsequent warnings and the creation begins.
Booting from USB stick
.
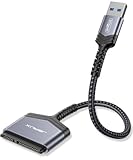
After the completion, we can use the stick to boot from it. We plug the USB stick into our system. It works the same for both laptop and desktop. We can choose to install the new SSD directly into the system, for example on a desktop. Alternatively, we use a USB-SATA or USB-NVMe adapter.

- ✅【SCHNELLER ZUGRIFF AUF SATA-SSD ODER HDD】: Fügen Sie Ihrem Laptop Laufwerksspeicher...
- ✅【SuperSpeed USB 3.0】: Datenübertragungsraten von bis zu 6 Gbit/s nur für SSD. USB...
- ✅【UASP-Funktion】: Bietet schnellere Übertragungen bis zu 70% schnellere...

- Kompakt und transportabel, einfache und werkzeuglose Installation.
- Plug and Play, Hot Swap; Highspeed USB 3.0 Spezifikation, abwärts kompatibel zu USB 2.0.
- Schnelle Ver- und Entschlüsselung erlaubt hohen Durchsatz ohne große Leistungsabstriche bei...
- 【Schneller Zugriff auf eine SATA-SSD oder -Festplatte】Fügen Sie Ihrem Laptop Speicherplatz...
- 【Hochgeschwindigkeitsausgabe】Der SATA-zu-USB Adapter unterstützt die...
- 【Wichtiger Hinweis】Für 3,5-Zoll-Festplatte nicht verfügbar. Nicht kompatibel mit ATA (IDE...


- 10 Gbps blitzschnelle Übertragung: Das NVMe Gehäuse mit USB C 3.2 Gen 2 Schnittstelle unterstützt...
- Breite Kompatibilität: Das M2 SSD Gehäuse ist mit NVMe PCIe M-Key/M+B Key kompatibel. z. B...
- UASP und TRIM unterstützen: Das M.2 Gehäuse unterstützt UASP und TRIM Protokoll, die eine...

- 【Universell Kompatibles SSD-Gehäuse】FIDECO NVMe Gehäuse ist kompatibel mit...
- 【Einfache Festplatteninstallation】FIDECO M.2 SSD Gehäuse verfügt über ein Sandwich-Design...
- 【10Gbps Übertragungsgeschwindigkeit】FIDECO NVMe USB Adapter verwendet die neueste USB C...

- 【10 Gbps High-Speed-Übertragung】Das NVMe Gehäuse mit USB C 3.2 Gen 2 Schnittstelle...
- 【Intelligenter Chip】Dieses M2 Gehäuse ist mit einem intelligenten Chip ausgestattet, der die...
- 【NVME Gehäuse】UGREEN M2 NVME Gehäuse ist nur für NVMe M-Key/M+B Key M.2 SSD (PCIe-basiert...
We now start the computer and call the boot menu. This is always a little bit different with every computer, mostly it is necessary to press the keys ESC, F2, F10, F11 or F12 repeatedly during the start.
In the boot menu we start now from the USB stick.

We can now set the language and start the system.
Clone
Now we clone the hard disk. There is a menu item here.

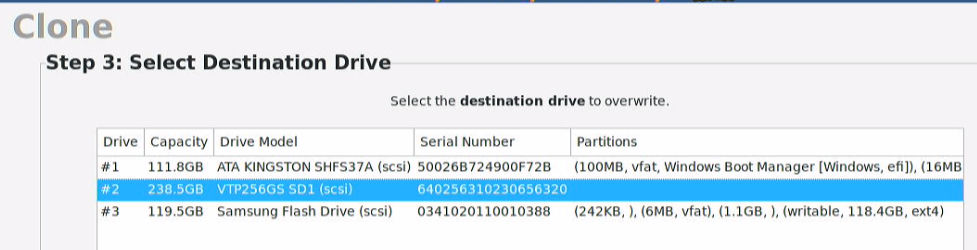
A wizard guides us through the process. We first select the source drive.

Then the destination drive. Be sure to specify the correct drives here.
In the next step we select the partitions or they are selected. So just “Next”.

There will be a summary. Here we can check everything again.

Then the cloning process begins. Depending on the amount of data it takes a while.
Done! If everything has worked, there is a final summary.

Conversion hard disk and reboot
We now shut down the computer. We remove the old hard disk and insert the new one. Windows should start afterwards. If we now look in the explorer, the new hard disk still has the same size. But don’t worry, the space is there, as a look in the disk management reveals.

Optimize free space
.
In many cases, we now want to allocate the free space to our C:\ drive. We start RecueZilla from our USB stick again. This time we exit the wizard. Afterwards we end up in the desktop. Via the start menu we find “gparted”.
Here we can now move the recovery partition from Windows.
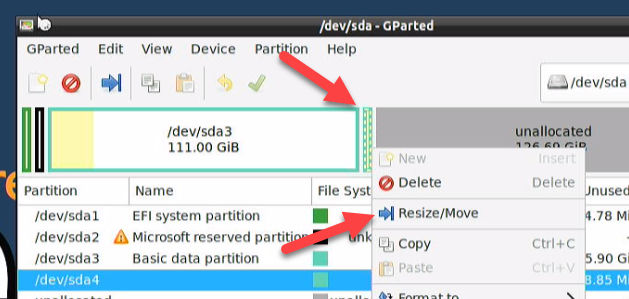
We move the partition to the end.
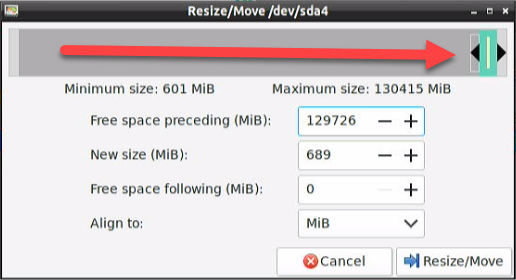
A warning appears, which we confirm. Then we execute the operations. The partition is now moved to the end.

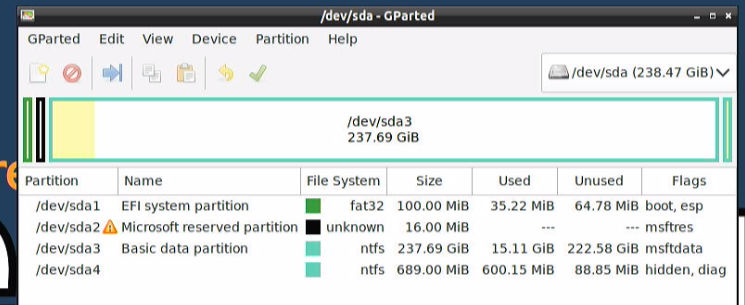
This prepares the way to extend the C:\ partition by the free space. We also change the size here and increase the partition by the free space.

Done! Afterwards our new partitioning looks something like this.
Start Windows
We now start Windows again and can use the complete memory of our SSD.

Thank you the guide. Worked great to upgrade my SSD on my laptop to a larger size. Fyi if the original HD doesn’t show up in Recuezilla make sure bit locker is turned off and the drive decypted. Also you might need to go into the bios and turn RAID off. But once you need to boot back into windows turn it back on.