VBA is often used to automate routine tasks and make everyday life easier. You can also make your life easier in Outlook with a few well-deployed VBA scripts. A basic function can be to automatically create a new e-mail with the execution of a macro or a click.
Of course, you could argue: “You can do that in Outlook too…using the ‘New email’ button”. Of course, but what if I can also specify the recipient in the new email automatically? Or if you can specify a pre-formatted text where the font and font size are set correctly? Or if I can also transfer the priority of the email?
That would save a lot of clicks, provided the use case allows it.
Create email with CreateItem() method
To automatically create a new email with Outlook, you can use the following macro. The function to be used is Application.CreateItem(…).
You can also immediately see the wealth of parameters that can be configured. Parameters that are not required can simply be omitted.
Public Sub NewMail()
    Dim olItem As Outlook.MailItem

    Set olItem = Application.CreateItem(olMailItem)

    With olItem
         .To = "john.doe@my-domain.de"
         .CC = "mr.xy@gmail.com"
         .BCC = "mrs.xy@yahoo.com"
         .subject = "Important News"
         .VotingOptions = "Accept;Reject"
         .BodyFormat = olFormatHTML
         .Importance = olImportanceHigh
         .Sensitivity = olConfidential
         .Attachments.Add ("c:\Users\danie\Desktop\ekiwi_logo_en-1.jpg")
         .ExpiryTime = DateAdd("d", 1, Now)
         .DeferredDeliveryTime = #2/18/2024 8:00:00 AM#
         .HTMLBody = "<BODY style=font-size:20pt;font-family:Calibri><p>Hello,</p><p>today you receive our new newsletter</p><p>best regards,<br>Max Iceberg</p></BODY>"
         .Display
    End With

    Set olItem = Nothing
End Sub
Explanation of parameters
The parameters to be set are actually also familiar from the normal operation of Outlook and are almost self-explanatory.
Parameter “To”:
The recipient address is entered here or, if there are several addresses, several recipients can also be entered here, separated by semicolons.
Parameter “CC”:
Here, you enter the email addresses that should receive a copy of the email; again separated by a semicolon if there are multiple email addresses. All recipients of the email can see who is in the CC
Parameter “BCC”:
The parameter is for “Blind Copy”. Enter the email addresses here, as for “To” or “CC”. The only difference is that the recipients cannot see that this email has also been sent to the recipients named here.
“Subject” parameter:
Simply enter a text here as the subject of the email
“VotingOptions” parameter:
These are voting buttons for a reply email that are displayed in the email. You can enter any words here. The individual voting buttons must be separated from each other by semicolons.
Parameter “BodyFormat”:
Here you can specify the format of the email. There are 3 options that can be specified using the following enumerations. You can either use the number or the wording:
- olFormatUnspecified (value 0): no specified format
- olFormatPlain (value 1): formats the email as text
- olFormatHTML (value 2): formats the email in HTML
- olFormatRichText (value 3): formats the email in RichText format
“Importance” parameter:
This can be used to display the importance of an email. In the email itself, high importance is usually marked with a red exclamation mark. The following enumerations or the value itself can be used to indicate the importance:
- olImportanceLow (value 0): low importance
- olImportanceNormal (value 1): no or normal or medium importance
- olImportanceHigh (value 2): high importance
“Sensitivity” parameter:
This parameter can be used to give the email a status indicating how sensitive the content is to be treated or how confidential the email is to be treated. To do this, you can pass four values (enumerations), which have the following meaning. The recipient of the e-mail is then shown, for example, that the e-mail is to be treated as “confidential”. The values are almost self-explanatory:
- olNormal (value 0): no confidentiality level; default value, in this case the parameter can also be omitted
- olPersonal (value 1): personal
- olPrivate (value 2): Private
- olConfidential (value 3): confidential
“ExpiryTime” parameter:
An expiry date for the email can be specified here. Once the expiry date has been reached, the email is marked as crossed out by the recipient, but remains in the inbox. This symbolises to the recipient that the content of the email is no longer relevant.
In the example above, the function DateAdd was used with the parameter/function Now. This is used to pass an expiry date calculated from today in weeks, days, months or similar.
Parameter “DeferredDeliveryTime”:
Here you can set a delayed sending of the email or a delayed delivery of the email. You pass this parameter a date/time when the email should be delivered. The email remains in Outlook’s outbox until this date/time is reached.
“Attachments” parameter:
The Attachments parameter is a list of all email attachments that are to be attached to the newly created email. Use the Add function to add the individual attachments to the list. To do this, pass the Add function the full path to the respective file that is to be attached to the email.
Parameter “HTMLBody” or “Body”:
This is where you insert the actual email text; in our case in HTML format. If, for example, “PlainText” was specified as the body format, this parameter cannot be used. Instead, the parameter “Body” is used. For the RichText format, the parameter “RTFBody” must be used.
There are a number of other parameters that can all be configured in the VBA macro, such as ReplyTo, i.e. the reply email addresses to which the reply email should be sent.
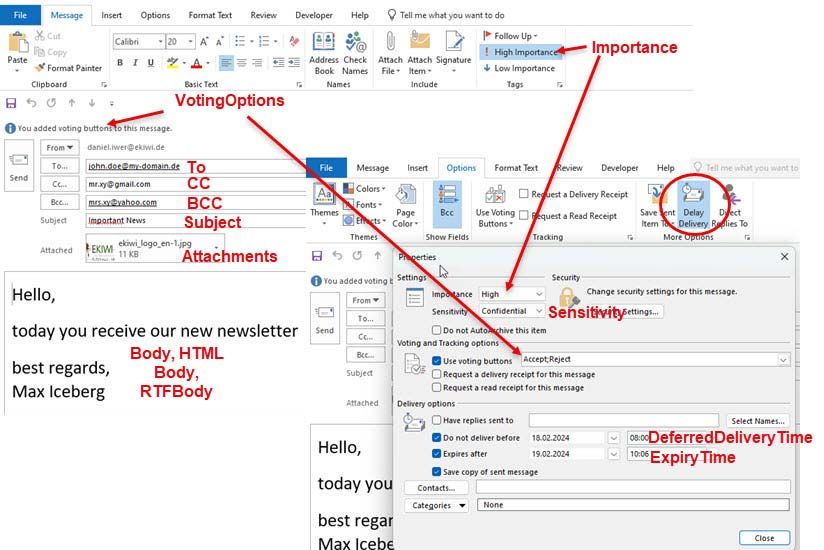
Result: View of the newly created email in Outlook
Method “Display”
Calling Display causes the newly created email to be displayed in Outlook.
The following image shows the new email created with VBA and the effects of the individual parameters using the code example shown above.


