How to encrypt your Windows system drive with VeraCrypt.
When it comes to encrypting the system partition, we usually think directly of Bitlocker in Windows. Unfortunately, this encryption method is only included in the Pro version of Windows. Home users do not have access to this function. If you have the Home version or don’t trust Microsoft, you can also use VeraCrypt for encryption. VeraCrypt is the modern version of the discontinued TrueCrypt.
In this tutorial, we will look at how we want to encrypt Windows or the Windows system partition. Dual boot configurations, e.g. Windows and Linux, are not considered.
Download
First we download VeraCrypt. The latest version is available on the project’s download page. We then install the software.
We generally recommend backing up the system and data before encryption.
Encryption of the system partition / drive
After we have opened VeraCrypt, we select “System – Encrypt Sytem/Drive”.

This starts a wizard which will guide us through the process of the encryption. In the first step we select “Normal”.

Next we can select what we want to encrypt. Usually the first option is the right one. This encrypts the Windows system partition. If you have multiple partitions on your drive, we have to select the second option in order to encrypt all partitions on the disk.

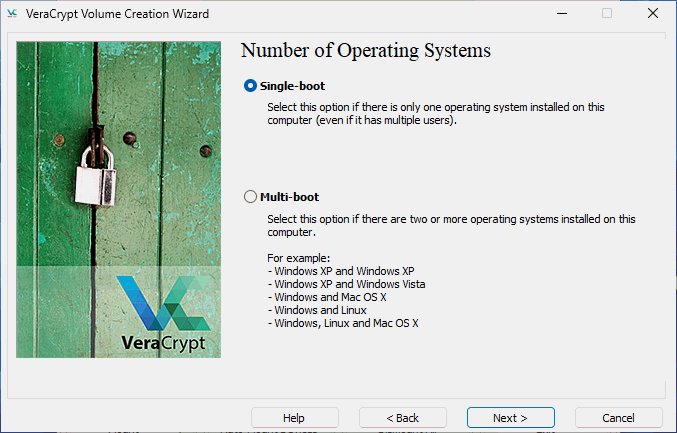
The next step defines the boot option, in our case, we have only one operating system, so we select the first option. If you have multiple operating systems installed, like Windows and Linux, you have to select the second option.
Next we define the encryption algorithm. Usually the default settings are fine, so we just click next.

Now we have to set up the password. This password will be used to unlock the system. In general, the longer, the better.

After we set up the password, we have to generate some random data. This improves the encryption strength, so just move the mouse around in the windows.

We can, and should, also create a rescue disk. If your bootloader gets damaged for some reason, the rescue disk can be used to decrypt and restore your data. So save this to a secure location.

The wipe method defines what should be done with empty space on your disk. If you have a new computer, we can select “None”, if the computer already contains data, you should wipe empty disk space. Otherwise, some unencrypted data might be recovered.

Before the encryption is performed, VeraCrypt performs a boot test. This makes sure the new bootloader works and you can enter the password in order to boot the system. This makes sure that everything works before encrypting your data.

During boot, you now have to enter your password. PIM is only required if you have configured one.

Now Windows should boot as normal and VeraCrypt should report, that the test completed.

You can now click the “Encrypt” button in order to start the encryption. After clicking the button, it might take a few minutes before the encryption starts, to be patient.

Depending on your system and amount to data, the encryption process can take some time. You can pause the process. Once the process is finished, your data is now encrypted and before booting your system you have to enter the password to unlock your data.
Decrypt your VeraDrive system volume
The decryption process is also straight forward. Just select “System – Permanently Decrypt System Partition/Drive” from the menu. You will get some warnings about your data being encrypted.

After that your drive will be decrypted and the VeraCrypt bootloader is removed. Windows will now start without password.

Conclusion
In contrast to Bitlocker, we have a few more steps and a little more information to click through when using encryption. In the end, the method also works quite well on modern computers with Windows 11.
VeraCrypt is therefore a good option for Windows Home users or users who also have Linux installed at the same time.
Unlike BitLocker, however, the TPM chip cannot be used here. Bitlocker has the advantage that the key can be stored in the TPM chip so that Windows simply boots in everyday use. This offers more convenience, but may also be somewhat less secure.