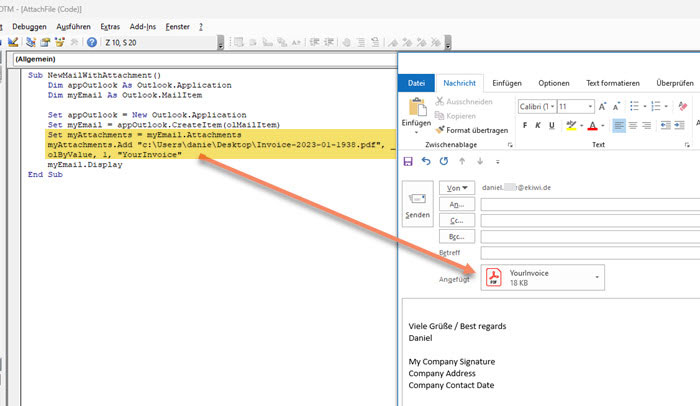
You can speed up the process of adding an attachment to an e-mail in Microsoft Outlook by using a suitable macro. Often you click on “Insert” via the ribbon menu. ➜ “Append file” to the respective file. Or you can first find the file in Windows Explorer and then drag it into the new mail using Drag&Drop. This is already relatively practical, but can be improved with a VBA macro, especially if you send the same file over and over again or the file attachment is always under a certain path and corresponds to a concrete nomenclature. In an earlier article it was already shown how to automatically save email attachments with VBA, now the reverse way, i.e. attaching files to a mail using VBA, will be shown here.
VBA code
With the following VBA code we first create a new Outlook email and then we automatically insert an attachment into this email.
Sub NewMailWithAttachment()
    Dim appOutlook As Outlook.Application
    Dim myEmail As Outlook.MailItem

    Set appOutlook = New Outlook.Application
    Set myEmail = appOutlook.CreateItem(olMailItem)
    Set myAttachments = myEmail.Attachments
    myAttachments.Add "c:\Users\danie\Desktop\Invoice-2023-01-1938.pdf", _
    olByValue, 1, "YourInvoice"
    myEmail.Display
End Sub
Running this code/macro will open and display a newly created email with the appropriate file attachment, as shown in the image below.

Explanation of the code
The expression Set appOutlook = New Outlook.Application simply creates an object from the Outlook application for further use. This is then taken to create the new email CreateItem(olMailItem) with. The new email object myEmail, has a property/object that manages the attachments. We assign this to our myAttachments object.
The actual interesting method in this case is myAttachments.Add. This can be passed four parameters in the following order:
-
- Source (mandatory): this is the full file path to the file to be attached to the mail
- Type (optional): defines the type of file attachment. This parameter corresponds to the OlAttachmentType enumeration of which there are four (see below)
- Position (optional): here you can define where the attachment is inserted in the e-mail. This is a numerical value. If you enter the value “1”, the attachment is positioned at the beginning of the e-mail. With any other number, the attachment is positioned at the point corresponding to the number of characters in the e-mail text. If the number is greater than the number of characters of the e-mail text, the attachment is inserted at the end.
- DisplayName (optional): Here you can give the file attachment a different name. This is the file name as it then appears in the e-mail. However, this parameter does not work in all constellations. For it to work, the type olByValue must be used and the e-mail must be formatted in rich text format. For plain text or HTML emails, the file name would be used as specified in Source.
OlAttachmentType
As mentioned earlier, of these there are four types with the following meaning:
-
- olByReference: You should no longer use this type. It is no longer supported by current Outlook versions
- olByValue: With this type, the attachment is inserted into the e-mail as a copy of the original file. This should be the most suitable type for most use cases. If the original file is renamed, edited or deleted, this will not affect the inserted file
- olEmbeddeditem: This type is used when inserting attachments in Outlook message format (*.msg files)
- olOLE: This type concerns special objects for which Microsoft has created the OLE (Object Linking and Embedding). This allows objects/applications to be cross-linked or embedded in other Microsoft applications. The best example of this is when you insert a Visio drawing into Word, for example. Then this is inserted in such a way that one can edit the Visio drawing within Word.

