
A remote desktop connection (RDP) is quickly set up, but it should not be operated openly from the outside via the Internet, e.g. via port 3389, as some weaknesses of RDP are known and it is a popular target for attacks. An alternative possibility is to establish RDP access via SSH.

RDP without VPN
Common practice, also in many companies, is actually to use an encrypted VPN connection for RDP access in order to seal it off from the outside world. This is generally considered to be largely secure. However, a VPN client is required on the client computer from which the RDP connection is to be initiated. Often the Windows on-board means are not sufficient and a separate VPN client must be installed. However, this is sometimes difficult if, for example, one does not have the necessary rights on the client computer to install additional software. On the other hand, configuring the VPN connection without the manufacturer-based software module is often difficult or impossible because there are many different types of VPN protocols that are not compatible with each other. I have not yet found a VPN client that can be installed as a portable version without admin rights. Therefore, it would be practical to establish a secure RDP connection without using VPN.
This is possible by tunneling the RDP protocol through an SSH connection. And min. SSH client (PuTTY) exists in the portable version, so that an installation without admin rights or starting from the USB stick is possible.
Setting up an SSH server on the target system
First, you need to install and activate an SSH server on the target system, which I described in a previous article for Windows. To do this, install the OpenSSH server via “Optional Features”. Under “Services” you then have to configure the start-up behavior or start the SSH server.
My description in this regard is based only on access by password. However, for security reasons, it is recommended to allow the SSH connection only with the option “PubkeyAuthentication“. Passwords can be spied out or cracked by brute force.
If the SSH connection is to be established externally via the Internet, Port 22 may have to be released in the router or firewall for incoming connections.
In order for the SSH server to be accessible from outside, the firewall or router must be addressable via a public IP address, a domain name or a DynDNS name.
Switch on RDP on target system
In order for an RDP session to be established through the SSH tunnel, Remote Desktop must be activated on the target system. To do this, proceed as follows:
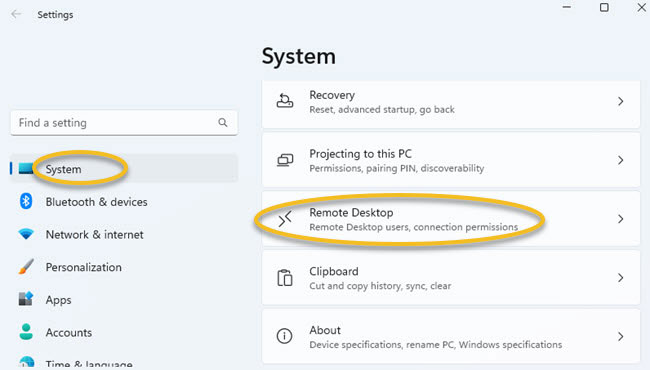
- Call up Windows settings, e.g. by right-clicking on the Windows menu
- Select “System”
- Click on “Remote Desktop”
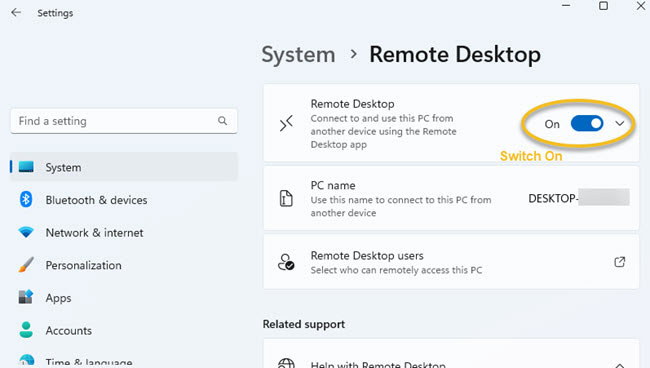
- and then activate Remote Desktop
Download and install SSH client (PuTTY)
If the server and RDP share are set up correctly on the target system, access can be made from another system. To do this, you need an SSH client, which is available via PowerShell or also from OpenSSH. We use PuTTY as SSH client, which can be downloaded here.
The portable version is available on other sites, such as Chip.de. These can then be saved anywhere without admin rights.
Configure SSH client PuTTY
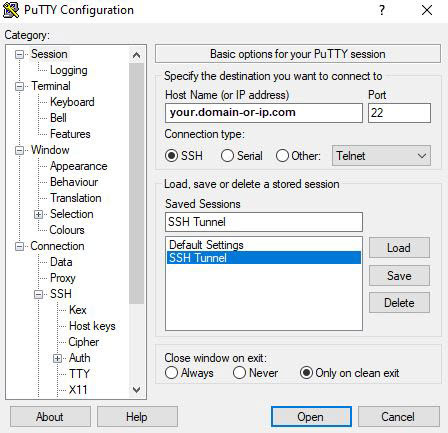
1st step: Set up session
The first thing to do is to configure the SSH session. To do this, you need to:
- Enter the domain name or IP address of the target system
- Enter port 22, unless a different port has been configured on the server side
- Select “SSH” as “Connection type“
- Now you can give the session a name and save it for the purpose of reuse (button “Save“)
2nd step: configure tunnel in PuTTY
Next, in the tree structure on the left, go to “Connection” ⮞ “SSH” ⮞ “Tunnels“. Here you configure the port forwarding within the tunnel. At “Source Port” you select a more or less arbitrary port, here Port 1024 was selected. This is then used in the fourth step to establish the RDP connection.
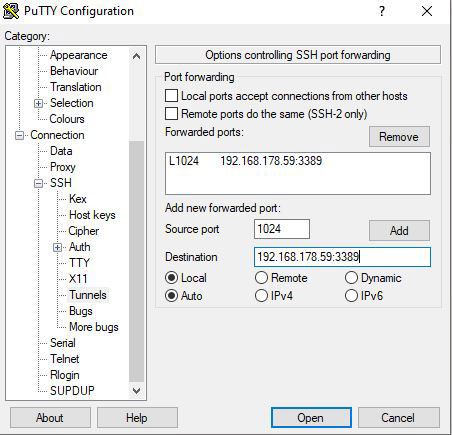
At “Destination” you enter the local or private IP address of the destination computer together with the RDP port 3389. This is the IP address of the computer on which the SSH server is running and Remote Desktop has been activated. In this example, the computer is in a private network and therefore has a private IP address. If a different RDP port has been configured, this must be adapted here accordingly.
3. step: Establish SSH connection
After you have made all settings, you can open the SSH connection. To do this, go back to Session in the tree structure, select the desired session and click the “Open” button.
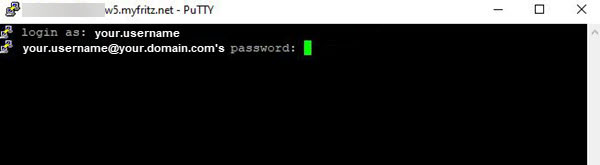
Now you have to enter the login data.
- login as: This is the username of the Windows user account on the target computer where the SSH server is running
- password: This is the password associated with the user account on the target computer
If necessary, a message will appear stating that the authenticity of the host system could not be determined and that the key is not known.
The authenticity of host [...] cannot be established.
This Key is not known by any other names.[...]
If you are sure about the connection, you can confirm it with “yes”. Then the computer is added to the list of known hosts.
4th Step: Establish Remote Desktop Connection
The last step is to establish the RDP connection. To do this simply:
- Enter “RDP” in the Windows menu and open the App Remote Desktop Connection.
- For “Computer:” enter the local IP address 127.0.0.1 followed by the local port 1024 configured in PuTTY.
- The username: is entered as the computer name of the target system followed by the username of the target system separated by backslash
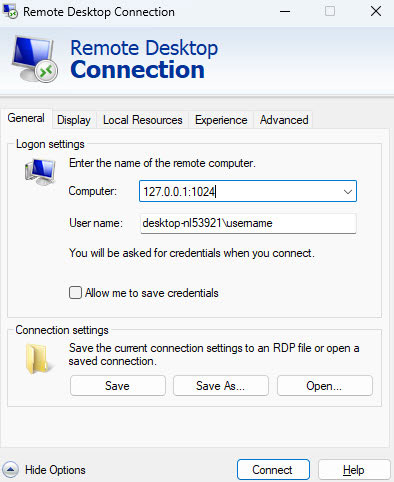
If everything has worked, you can now click on the Button “Connect” and the RDP session will open. You can start working directly as if you were sitting in front of the computer of the target system itself.