
There are a number of useful use cases for installing and running an SSH server on a Windows system. For example, an SSH server grants secure remote maintenance access at the console level. One can then dial in with an SSH client on the server system in question. Then, provided the permissions allow it, one moves around the target system like an administrator. Another less widespread method is to establish a remote desktop connection (RDP) via SSH.
What is SSH?
Quite briefly: SSH is the acronym for Secure Shell or Secure Socket Shell. This is a secure network protocol that is primarily intended to enable network administrators to connect to the computers and servers concerned from outside and then carry out administrative and configurational work. The protocol includes various services as well as security measures (encryption/authentication etc.) to establish a secure connection. Thus, it is also often used as a replacement for FTP in the form of SFTP (Secure FTP) for file exchange.
Installing an OpenSSH server in Windows
Add as optional feature
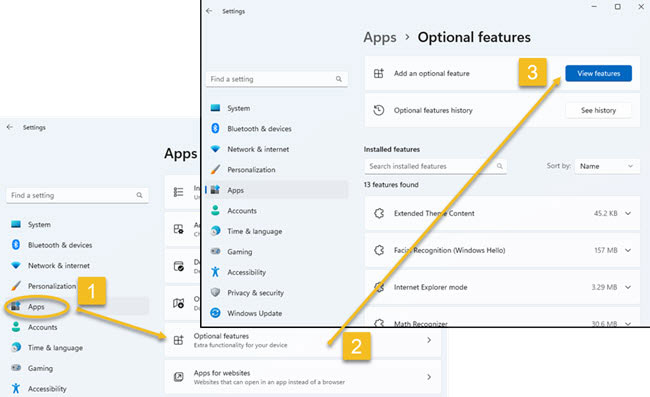
To set up the SSH server in Windows, the first thing to do is to add OpenSSH Server as an optional feature. To do this, proceed as follows and shown in the screenshots below:
-
- Open Windows “Settings” (via the Windows menu or right-click on the Windows menu)
- Select “Apps” and click “Optional Features”
- “Add optional features” button and “View features” button
- Scroll to “OpenSSH Server” or enter term in search box and then select and click “Next”.
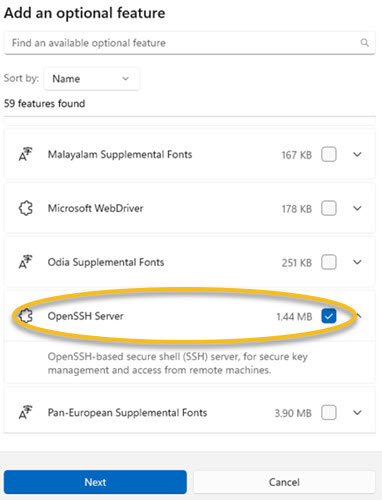
The download and installation process of the SSH server will then begin. If this has been completed successfully, the OpenSSH server will appear in the list “Installed Features“.
Configure SSH server under “Services”
Depending on how you want to use the SSH server, you will need to make other settings and configurations. By default, the SSH server is set so that it must be started manually. If you want the server to start automatically at every system start, you can configure this under “Services“.
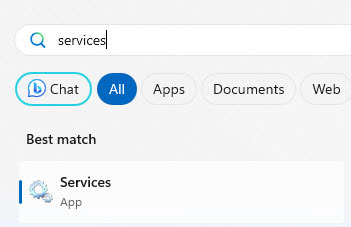
In the Windows menu, simply type “Services” and then click on the Services app.
Then select “OpenSSH SSH Server” from the available services and click on it.
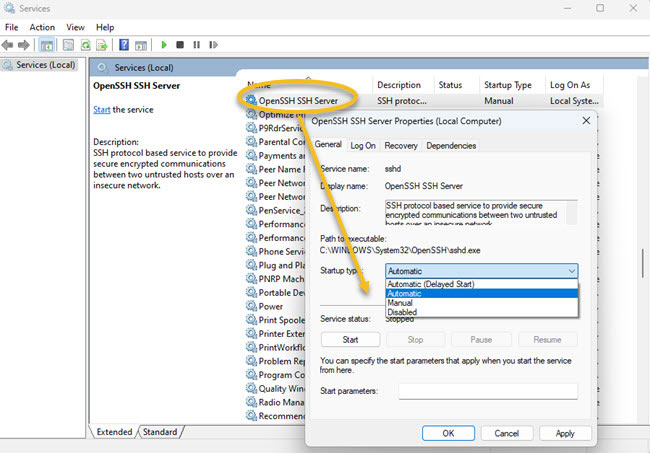
Now you can select “Automatic” for Start type. The server will then always start automatically when the computer is restarted. Further options for controlling the SSH server are available via the buttons under “Service status” (“Start“, “Stop“, “Pause“, “Resume“) or by starting the SSH server with the Powershell.
Accessing the Windows system via OpenSSH server
Accessing the system from outside via SSH can then be done with any SSH client, such as PuTTY, OpenSSH client, MobaXterm. It can also be done quite easily via the PowerShell of Windows. There, as shown in the following screenshot, simply enter the command ssh followed by the IP or domain name of the target computer:
ssh your.computer.de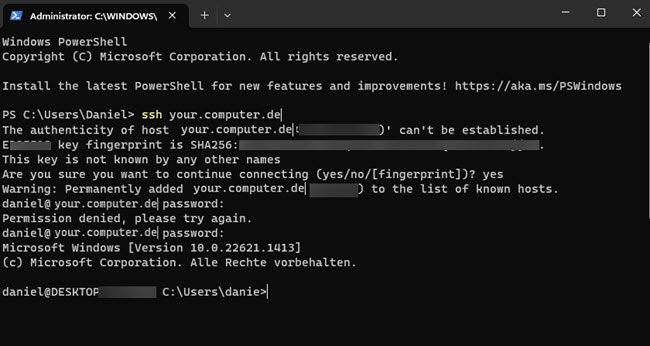
You can see that in the case of this example here, the trustworthiness of the key is still criticised. In a known environment, you can accept this and continue. In larger professional environments, public key authentication should be introduced.
The next step is to ask for the password. This password corresponds to the user account password of the Windows computer on which the SSH server is running.
Firewall rules and router rules
Depending on from where, from inside or from outside the network, the firewall and/or router rules must be adjusted.
The SSH protocol uses port 22 by default and is based on TCP. This must be configured accordingly for incoming connections in the firewall or a router, such as the Fritz!Box.
There should be no problems with the Windows firewall, which should already accept these incoming connections by default. If you still have problems establishing a connection, you should also check the settings there and allow port 22 for incoming connections. The Windows firewall can be found under “Settings” > “Privacy and Security” > “Windows Security” > “Firewall and Network Protection” > “Advanced Settings” or simply type in “Defender” in the Windows search menu.