Secure Shell (SSH) is a cryptographic network protocol that is often used to establish secure connections between computers and networks, for example, for file transfers or to establish SSH remote desktop connections. Since Windows 10 and Windows Server 2019, Windows operating systems have a built-in OpenSSH server that allows you to make SSH connections to the Windows PC or server. In this article, we will show you how to start the OpenSSH server on Windows using PowerShell.
Step 1: Install OpenSSH server
Before you can start the SSH server, you need to make sure that OpenSSH is installed on your system. You can do this through PowerShell by following the steps below, or the SSH server can be installed manually using the optional features.
- Open PowerShell as administrator by right-clicking on the Start menu and selecting “Windows PowerShell (Administrator)”.
- Run the following command to install the Windows OpenSSH Server feature:
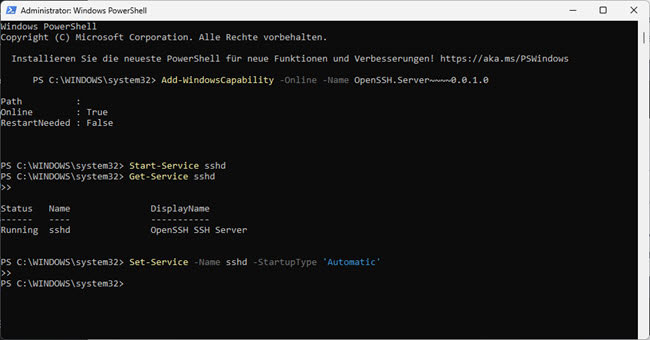
Add-WindowsCapability -Online -Name OpenSSH.Server~~~~0.0.1.0 - Wait for the installation process to complete. You should see a message confirming that OpenSSH has been successfully installed.
Step 2: Start SSH server service
After OpenSSH is installed on your system, you can start the SSH server service:
In PowerShell (Administrator), run the following command to start the SSH server service:
Start Service sshdTo ensure that the service has started successfully, you can run the following command:
Get-Service sshdIf the status “Running” is displayed, it means that the SSH server service has been started successfully.
Step 3: Start SSH server service automatically
To start the SSH server service automatically when Windows boots up, the following command can also be run:
Set-Service -Name sshd -StartupType 'Automatic'Step 4: Add firewall rule
In most cases, the Windows firewall rule set should already fit after installing the SSH server. If not, the following firewall rules need to be added to make the SSH server reachable from other computers on the network:
New-NetFirewallRule -Name 'OpenSSH Server' -DisplayName 'OpenSSH Server' -Enabled True -Direction Inbound -Protocol TCP -Action Allow -LocalPort 22Close
Now you have successfully started the OpenSSH server on Windows using PowerShell. You can now make SSH connections to your Windows PC or server from other computers on the network or over the Internet. Remember that you need a username and password or an SSH key pair to access the SSH server.