
 Here we will show how to set up the Windows FTP server IIS. If you want to set up an FTP server with the on-board means of Windows, the Internet Information Services (IIS), it can quickly become a pain in the ass for anyone who does not frequently deal with it. Unfortunately, it is not as intuitive to set up as one might think, and there are many stumbling blocks to the desired success. So it can take hours to several days before you have solved all the problems as an occasional adminstrator.

- Intel Core i7-10610U Prozessor mit 1,8 GHz bis 4,9 GHz (Turbo Takt) [ 4 Kerne / 8 Threads ]
- 16 GB Arbeitsspeicher - 512 GB SSD Festplatte
- Ultrabook Laptop - 14 Zoll / 35,56 cm - 1920 x 1080 Pixel - Schnittstellen: 1x 3.5 mm Klinke - 2x...
Enabling FTP services
First of all, at least the IIS management console and the FTP service must be activated under Windows Features.
To do this, call up Windows Features via Control Panel -> Programs and Features -> Enable or Disable Windows Features.
In the tree, go to Internet Information Services and activate FTP Service under FTP Server and IIS Management Service and IIS Management Console under Web Management Tools.

Then open the Internet Information Services (IIS) Manager, for example, via Start -> Windows Administrative Tools.
Create a new FTP page
In the IIS manager, create a new FTP site with Add FTP site by right-clicking in the left window on Sites.
Now you have to assign a FTP site name, which can be individual, and define the physical path under which the documents and files are to be stored. FTP access from outside is then made to this path. In the example image, the default directory for the web server was selected. However, other physical folders are also possible. Later, you can also define virtual directories that refer to paths outside the specified physical path. However, this will not be discussed further here.
Then click on Next.

Binding and SSL settings
In the binding and SSL settings, you can make settings for encryption, as well as assign specific hostnames or IP addresses to the FTP service
The assignment of an IP address remains empty in our case. If you manage several FTP server sites, each one must be bound to its own IP address. If necessary, you can change the port if the FTP standard port is already occupied and used elsewhere. By default, this is set to port 21.Virtual host names can be used when working with domain names in the internal network.
We are not interested in virtual host names at this point either. This is interesting in larger networks where, for example, you work with domain names (domain controllers) or if you want to bind several FTP servers to one IP address.
In any case, you should activate SSL allowed or better SSL required so that the FTP connection is encrypted in the future. You also have to select an SSL certificate. In our case, we select an existing certificate. The IIS manager also offers the possibility to create your own certificate (self-signed). Of course, this is not accepted by all clients and there are corresponding warning messages. To avoid this, you need a public certificate from a corresponding certification authority (CA).

Authentication and authorisation information
The next step is the authentication and authorisation information. Here we leave the default settings for the time being. This will be adjusted again later.
For information: If you leave Anonymous activated, you can log in with the user name Anonymous and the e-mail address as password.
Standard requires login to the FTP server with user name and password. Dedicated user groups (also of an ActiveDirectory) or user accounts can then be defined that are allowed access.

Set up FTP user for access from outside.
For external access, there must be a separate user/user who is known to the Windows system and who has the appropriate authorisations.
A separate user must be set up under Windows. We do this via the console with
net user ftpuser2 * /add

You can thus also create several different accounts, for example to assign each authorised person their own account.
Now the new FTP account must be assigned the appropriate permissions to the folder of the FTP site. This can be done via the console with
ICACLS c:\inetpub\wwwroot /grant ftpuser:(OI)(CI)(M)
Or you can right-click in the IIS manager on the FTP site and select Edit permissions -> security. Alternatively, Windows Explorer right-click on the FTP folder -> Properties > Security.
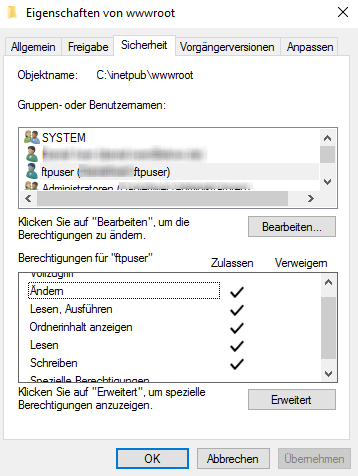
Now we select our FTP site again in the IIS manager and go to FTP authentication and deactivate anonymous authentication there.

Then go to FTP Authorisation -> Add permission rule and add the FTP user set up with Read and Write permissions.


Now you would think that access from an FTP client should theoretically already work from your own network. However, in most cases this will not work because the Windows firewall on the computer on which the FTP server is running must either be deactivated for test purposes or configured accordingly to the specified port.
To do this, call up the Windows firewall via the Start menu or use Control Panel->System and Security->Windows Firewall. Go to Advanced Settings -> Incoming Rules -> New Rule … -> Port and there release the required ports. As we will see in a moment, a dynamic port range must also be released here at the end.

At the latest, access with our created user account from the local network from an FTP client should work.
What will not work is access from outside the local network, e.g. from the Internet. For this, the corresponding port releases must also be configured on the hardware firewall or router. How these settings are to be made depends on the respective device. With the FRITZ!Box, this can be done under Internet -> Shares -> Port Shares.

- Flexible Gestaltung
- Hochwertige Material
- Langlebig
Port Shares Passive FTP
In most cases, one will configure Passive FTP access because Active FTP access can cause problems client-side, as with Active FTP the connection to the data port is initiated by the server, which is often blocked by client-side firewalls.
If you want to configure passive FTP, you must know that a dynamic port range is required for this (>port 1024). Here the client establishes the two port connections for the control connection and for the data connection. The client tells the server with the PASSV command that it is listening to port XXXXX. For this, however, the corresponding port range must be enabled on the server side.
In the IIS Manager, select the top node in the left tree structure and then select FTP Firewall Support. Now enter a port range (>1024) under Data channel port range. The port range defined here must now also be released in the Windows firewall and in the router or hardware firewall. (The top node must be selected because the port releases apply to all FTP sites if, for example, you have several)
Note: Before doing this, you should check which port range shares your router or hardware firewall allows. With the current FRITZ!Box version, only one port range of 255 ports can be shared at a time.

It works or it doesn’t!?
Now the moment has come when FTP access from outside via the Internet should also work. And the hairs on the back of your neck stand up with a flushed head and 180 pulse when it still doesn’t work after this odyssey! Such was the case with me, so the search for the cause went on, but I lacked the approaches for further sources of error Aarrrrgh!
I now watched the messages and commands of my FTP client, in my case Total Commander. At some point, I noticed the following message:
227 Entering Passive Mode (188,103,164,96,228,201)
Generalised: 227 Entering Passive Mode (A,B,C,D,m,n)
In the bracket expression, I was able to identify the first four blocks of digits as the IP address (188.103.164.96) I got from the ISP. Now the assumption was that the remaining two blocks of digits had something to do with the port. However, this is an unusual notation. If anyone knows in which standard or guideline this notation is specified, please comment here! In any case, the port number can be calculated using m and n; it is more or less a straight-line equation:
Port=256*m+n
Via this calculation, I was able to determine that the port addressed 58.569=256*228+201 was far outside the released port range. How could this be? Perplexity again.
Dynamic port range under Windows
Under Windows, default values are defined for the Dynamic port range. In the console you can view this port range with
netsh int ipv4 show dynamicport tcp
to have it displayed.

The result here shows a port range of 49152-65536. The mentioned port 58,569 is also within this range. It is difficult to judge whether this is a bug. However, if the dynamic port range is set to the port range defined in the IIS FTP server, access via the Internet from outside also works. The new port range can also be set via the console with :
netsh int ipv4 set dynamicport tcp start=56792 num=255
After you have completed all these steps, nothing should stand in the way of successful FTP access. On the one hand, this shows the power of the Windows FTP server, which probably leaves nothing to be desired for most admins, and on the other hand, the many additional settings of the Windows system, for which one does not even know whether it is a bug or a feature.

- Auf jedem Windows 10 fähigen PC und Laptop installierbar
- Online aktivierbar
- Nur für Neuinstallation nutzbar

- deutsch
- 64bit
- DVD-Laufwerk für die Installation